
This article attempts to give an insight to how we deploy code at Sykes, using Bitbucket and AWS
About Sykes
The techniques shared in this article were produced by the development team at Sykes. We are always pushing for more automated and more secure builds in our CI process. If you are a talented Data Scientist, Analyst or Developer please check out our current vacancies.
Context
Storing code on Bitbucket and deploying to AWS is quite a common set up, most tutorials or resources online demonstrate ways to deploy using secrets in the Build, this works well, especially using a user which can assume other roles.
Due to the variety of applications this user tends to be quite powerful, so the build process becomes an attractive target for credential leaking, this can sometimes happen with Github actions running on Pull Requests with the AWS keys in the environment.
We wanted to reduce the risk of this key leaking and if it did we need to be able to limit damage this key could cause.
Using OpenID connect
Ideally, we do not want any secrets in the build, removing secrets simplifies lots of things as the requirement to rotate the credentials goes away also.
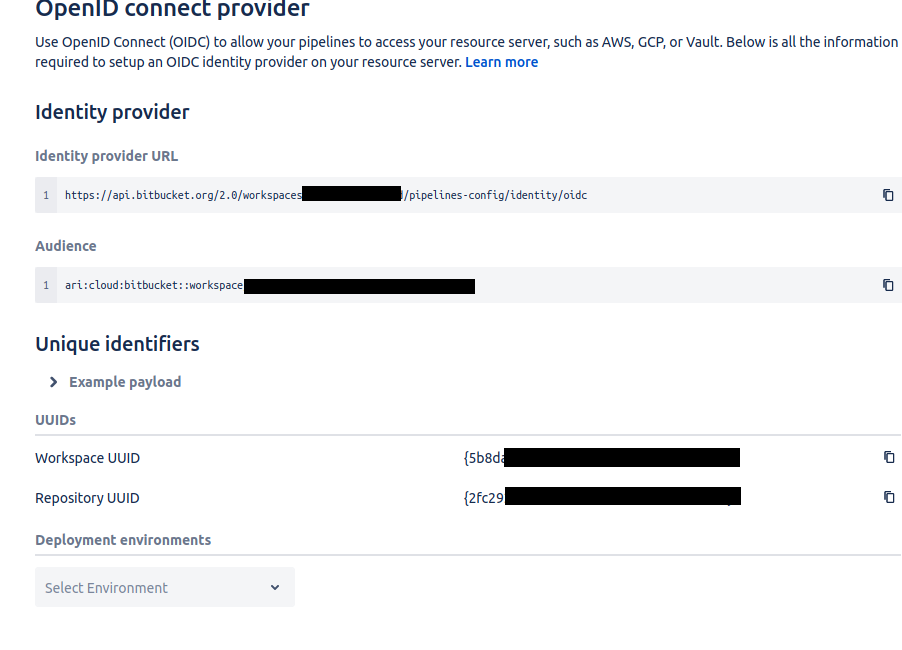
We settled on a solution using OpenID Connect. To set this up go to a repo in BitBucket, Click Settings, and then Open ID connect
This URL should get you there - https://bitbucket.org/workspace/codebase/admin/addon/admin/pipelines/openid-connect
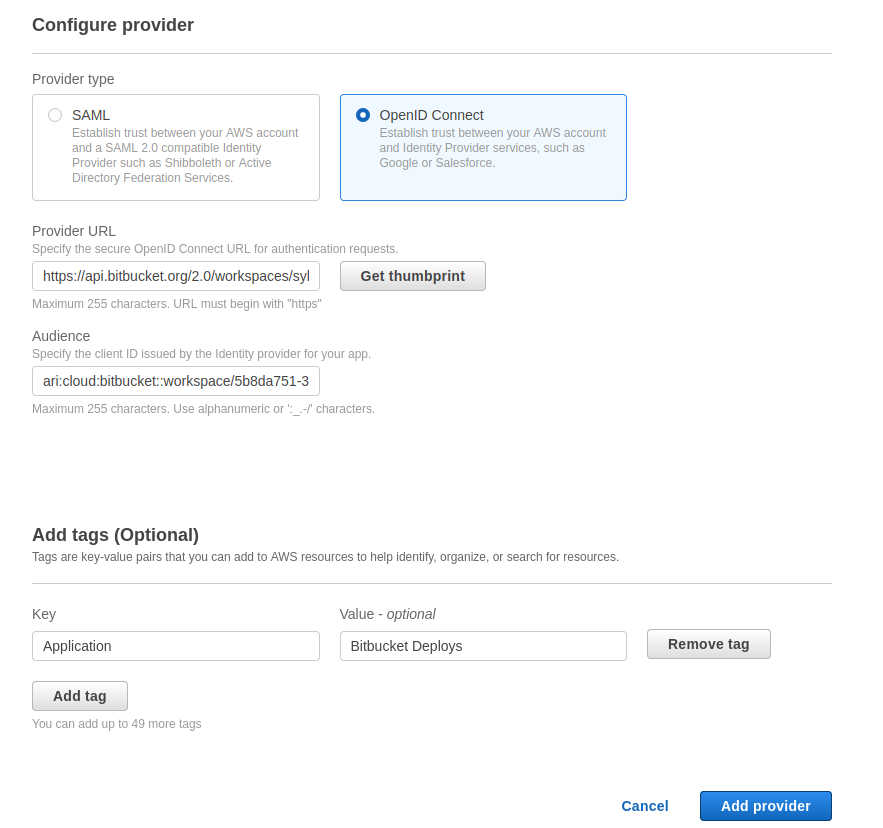
Next we need to allow this as an external identity provider in AWS. Go to IAM, and then Identity Providers
From here click add provider and then paste the values from the bitbucket page.
This is now set up!
Some terraform if you prefer to manage via that
resource "aws_iam_openid_connect_provider" "bitbucket" {
  url = "https://api.bitbucket.org/2.0/workspaces/workspaceURL/pipelines-config/identity/oidc"

  client_id_list = [
    "The Audience String from BitBucket (See screenshot above)",
  ]

  thumbprint_list = [
    "a031c46782e6e6c662c2c87c76da9aa62ccabd8e"
  ]
}
Create a Role
In IAM a role needs to be created with the permissions of the build.
When creating a role, select the web identity provider, this will give you a drop down option which will include the bitbucket identity provider we created above.
Press next and choose permissions like a normal role. Try to keep this role to allow only the parts which are necessary for the build.
Now its created we can lock it down a little more, Back on the original openid connect page in bitbucket, there is a repository id, if we use this ID in the policy statement we can stop one project using a role of another project. The role should have the minimum permissions it needs to deploy a single code base.
The Builds
Now the identity checks are set up, the builds need to be able to handle the new way of getting AWS credentials.
Each step in the build which needs AWS Credentials needs oidc: true adding to the yaml.
Example below using an atlassian image
  - step: &production-deploy
      name: Deployment
      deployment: production
      oidc: true
      script:
        - pipe: atlassian/aws-s3-deploy:1.1.0
          variables:
            AWS_DEFAULT_REGION: 'eu-west-1'
            AWS_OIDC_ROLE_ARN: 'arn:aws:iam::accountid:role/RoleName'
            S3_BUCKET: 'xxxxxxx'
            LOCAL_PATH: 'local/path'
            ACL: 'bucket-owner-full-control'
If you are using a base image you need to set up the CLI manually as follows (again making sure that oidc: true is set)
export AWS_WEB_IDENTITY_TOKEN_FILE=~/.aws/web-identity-token
echo "${BITBUCKET_STEP_OIDC_TOKEN}" >> ${AWS_WEB_IDENTITY_TOKEN_FILE}
chmod 400 ${AWS_WEB_IDENTITY_TOKEN_FILE}
aws configure set web_identity_token_file ${AWS_WEB_IDENTITY_TOKEN_FILE}
aws configure set role_arn ${AWS_ROLE_ARN}
With the role coming from the deployment variables / repository variables (used for checking a pull request for example)
Summary
Using OpenID Connect simplifies deploying to AWS in a secure way, which has built in rotation and allows really find grained controls over the deployment.
Debugging can be a little harder as its hard to know if the token has been passed correctly, using the aws cli it's easy to check
aws sts get-caller-identity
should show if the token has been picked up and in use
Github also supports OpenID connect and the process is very similar there